kubernetes安装typecho
一.安装k3s集群 (轻量级完全兼容k8s)
1.准备工作, 主节点和工作节点都安装docker, 最好清空iptables, 免得出现莫名奇妙网络问题
# 切换root
su
# 清空iptables
iptables --flush
iptables -t nat --flush
# 安装docker
curl -fsSL https://get.docker.com | bash -s docker
2.master节点安装k3s server, <master-public-ip>填写为公网IP
curl -sfL https://rancher-mirror.rancher.cn/k3s/k3s-install.sh | INSTALL_K3S_MIRROR=cn sh -s - --docker --node-external-ip=<master-public-ip>
3.安装成功后, 获取token
cat /var/lib/rancher/k3s/server/node-token
4.工作节点安装<master-public-ip>指定主节点公网IP, <token>为第三步获取的token, <node-public-ip>为工作节点公网IP
curl -sfL https://get.k3s.io | K3S_URL=https://<master-public-ip>:6443 K3S_TOKEN=<token> sh -s - --docker --node-external-ip=<node-public-ip>
5.由于大部分主机提供商不会提供绑定公网IP的网卡, 主和工作节点最好都设置以下注解, <public-ip>为公网IP, <hostname>为主机名, 可通过kubectl get node获取. 否则可能出现网络不通的情况, 都是血和泪😢
kubectl annotate nodes <hostname> flannel.alpha.coreos.com/public-ip-overwrite=<public-ip>
kubectl annotate nodes <hostname> alpha.kubernetes.io/provided-node-ip=<public-ip> --overwrite
kubectl annotate nodes <hostname> k3s.io/internal-ip-overwrite=<public-ip>
二.搭建typecho博客
1.安装cert-manager, 用于自动管理域名证书
kubectl apply -f https://github.com/cert-manager/cert-manager/releases/download/v1.14.4/cert-manager.yaml
2.配置ClusterIssuer, 需要设置邮箱
apiVersion: cert-manager.io/v1
kind: ClusterIssuer
metadata:
  name: letsencrypt-prod #自定义名称
spec:
  acme:
    # You must replace this email address with your own.
    # Let's Encrypt will use this to contact you about expiring
    # certificates, and issues related to your account.
    email: <your-email> # 设置邮箱
    server: https://acme-v02.api.letsencrypt.org/directory
    privateKeySecretRef:
      # Secret resource used to store the account's private key.
      name: letsencrypt-prod #自定义名称
    solvers:
      - http01:
          ingress:
            class: nginx
3.配置typecho
apiVersion: v1
kind: Namespace
metadata:
  name: typecho-prod #命名空间
  labels:
    name: typecho-prod
---

apiVersion: apps/v1
kind: Deployment
metadata:
  name: typecho
  namespace: typecho-prod
spec:
  replicas: 1
  selector:
    matchLabels:
      app: typecho-main

  template:
    metadata:
      name: typecho
      labels:
        app: typecho-main
    spec:
      nodeName: <node-name>  #指定调度节点,不需要请注释掉
      containers:
        - name: typecho-night
          image: joyqi/typecho:nightly-php8.2-apache # 镜像版本https://hub.docker.com/r/joyqi/typecho
          ports:
            - containerPort: 80
          env:
            - name: TYPECHO_DB_HOST
              value: <typecho-db> #数据库名
            - name: TYPECHO_DB_USER
              value: <mysql-user> #数据库用户名
            - name: TYPECHO_DB_PASSWORD
              value: <mysql-password> #数据库密码
            - name: TYPECHO_DB_DATABASE
              value: typecho #数据库名称
          volumeMounts:
            - mountPath: /app/usr
              name: typecho-data
      volumes:
        - name: typecho-data
          hostPath:
            path: /opt/k3s/typecho/data # 映射本机目录

---

apiVersion: v1
kind: Service
metadata:
  name: typecho-service
  labels:
    app: typecho-service
  namespace: typecho-prod
spec:
  type: ClusterIP
  selector:
    app: typecho-main
  ports:
    - port: 80
      targetPort: 80

---

apiVersion: apps/v1
kind: Deployment
metadata:
  name: mysql
  labels:
    name: mysql
  namespace: typecho-prod
spec:
  selector:
    matchLabels:
      app: typecho-db
  template:
    metadata:
      labels:
        app: typecho-db
    spec:
      nodeName: #指定调度节点,不需要请注释掉
      containers:
        - name: mysql
          image: mysql:5.7
          ports:
            - containerPort: 3306
          env:
            - name: MYSQL_DATABASE
              value: <typecho-db> #数据库名
            - name: MYSQL_USER
              value: <mysql-user> #数据库用户名
            - name: MYSQL_PASSWORD
              value: <mysql-password> #数据库密码
            - name: MYSQL_RANDOM_ROOT_PASSWORD
              value: <mysql-password> #数据库root密码
          volumeMounts:
            - mountPath: /var/lib/mysql
              name: mysql-path
      volumes:
        - name: mysql-path
          hostPath:
            path: /opt/k3s/typecho/mysql # 映射本机目录
---
apiVersion: v1
kind: Service
metadata:
  name: <typecho-db-host> # typecho安装界面数据库地址
  labels:
    app: typecho-db
  namespace: typecho-prod
spec:
  type: ClusterIP
  selector:
    app: typecho-db
  ports:
    - port: 3306
      targetPort: 3306

---
# 证书申请
apiVersion: cert-manager.io/v1
kind: Certificate
metadata:
  name: typecho-cert
  namespace: typecho-prod
spec:
  secretName: typecho-secret
  dnsNames:
  - <domain> #指定网站域名
  issuerRef:
    name: letsencrypt-prod
    kind: ClusterIssuer

---

apiVersion: networking.k8s.io/v1
kind: Ingress
metadata:
  name: typecho-ingress
  namespace: typecho-prod
  annotations:
    spec.ingressClassName: nginx
spec:
  ingressClassName: nginx
  tls:
    - hosts:
      - <domain> #指定网站域名
      secretName: typecho-secret
  rules:
    - host: <domain> #指定网站域名
      http:
        paths:
          - path: /
            pathType: Prefix
            backend:
              service:
                name:  typecho-service # 服务名
                port:
                  number: 80 # 服务的端口号 service port,非pod port
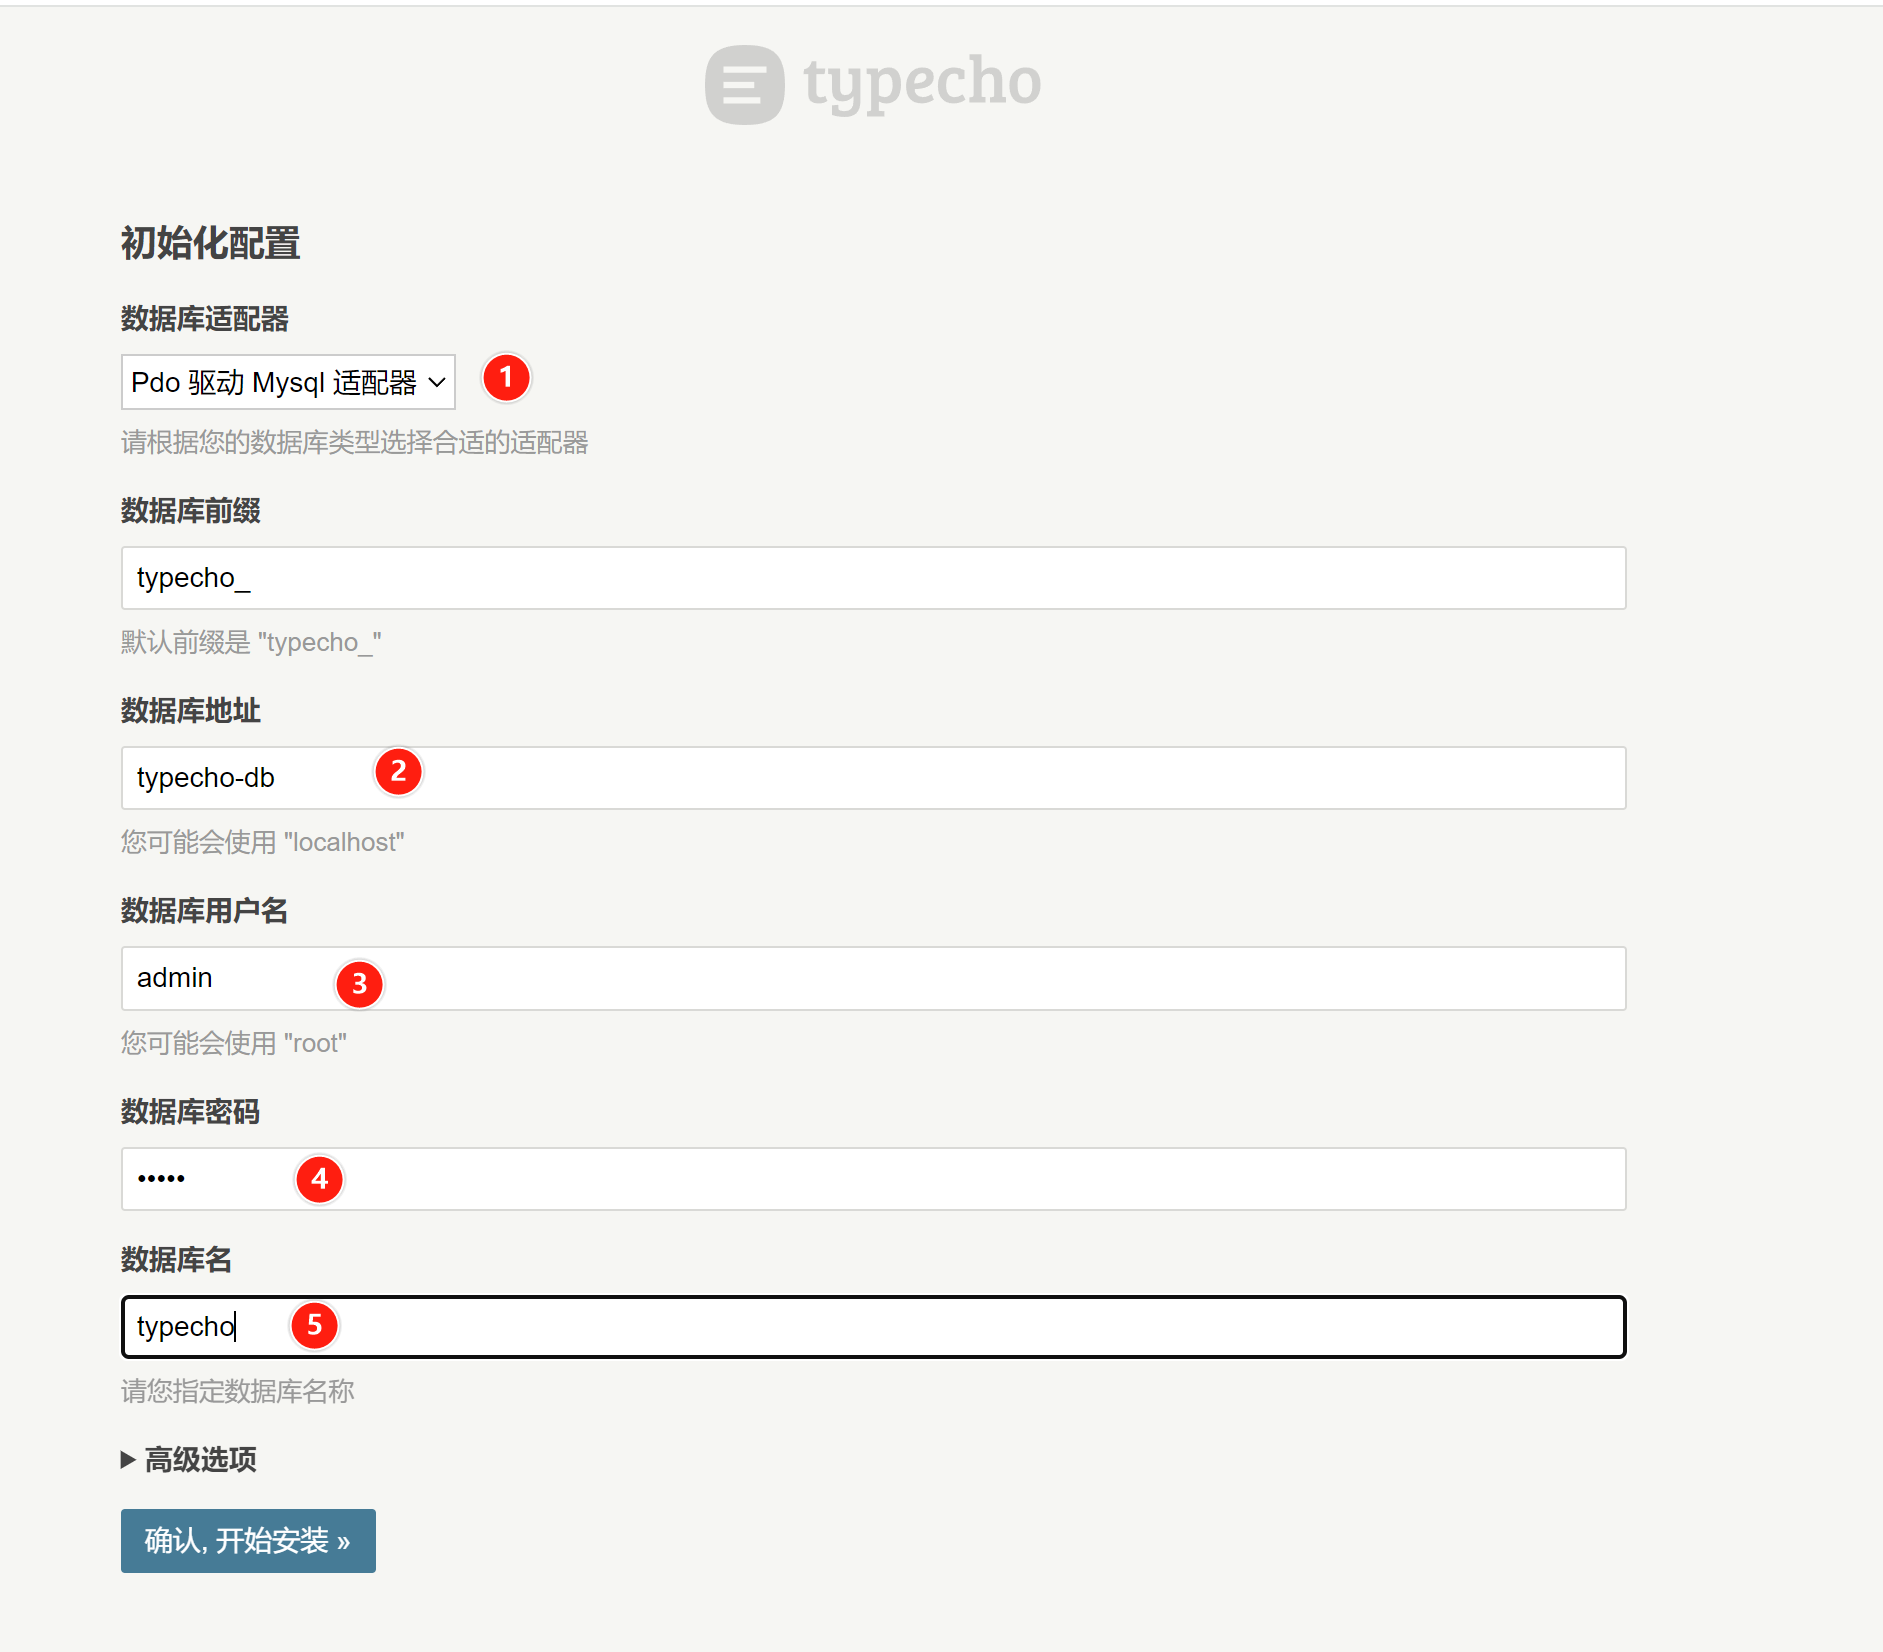
4.安装界面
1.选择pdo驱动
2.对应<typecho-db-host>
3.对应<mysql-user>
4.对应<mysql-password>
5.对应<typecho-db>

5.安装主题
cd /opt/k3s/typecho/data # 前面设置的映射地址
wget https://github.com/changbin1997/Facile/releases/download/v2.2/Facile-2.2-bundle.zip
unzip Facile-2.2-bundle.zip
暂无标签